 |
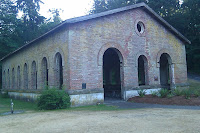
| Exterior |
 |
| Inside. I love the arched windows! So many decorating ideas! |
To the bride, this is questionable and she has a certain "Their Song" to which she wants to dance with her honey on their wedding day. We shall see. But in the meantime, these are some photos I took of the location.
As you can see, the interior is very rustic and this location has an old medieval church appearance. Voices echo inside, which will add to the effect.
 |
| The front where the vows will be taken. |
Last night while I was going over some of the details with her, she said that I should become a wedding planner and open a bridal shop. I would be able to plan out lovely details for flowers, bake for low budget weddings, sing (if I really wanted to), and provide the make-up and all beauty related services.
It sounds like a wonderful idea, but I would have to wonder how to manage my time and costs. I charge $20/hour now for my make-up services, but as soon as I get my certification from Kandee Johnson, I find that I will have to increase my cost, especially since I will have a professional kit (with products ranging from Make Up Forever and Mac, to Stila and Maybelline). We shall see. As far as the rest of the wedding goes, here are some more of the ideas we have come up with:
 |
| Inspiration cake: minus the pearls and patterned fondant. |
CAKE: Three-tiered round cakes with three different kinds of cake. All tiers will be covered in white fondant and adhered with buttercream. The ribbon fondant is going to be a light blue, which fits the theme colors of light blue and rose red. The bottom tier is going to be a chocolate cake, filled with whipped cream and strawberries. The second tier is a chocolate cake, filled with raspberries and a chocolate fudge. Their topper is going to be a simple white cake with chocolate truffle filling. To fit the medieval theme, I am going to place delicate single stem red rosebuds around the edges of the cake stand, then at the base of the bottom tier, place fully bloomed red roses. The tiers are going to alternate with the single stemmed rosebuds and fully bloomed roses. It is going to be a gorgeous cake. Because I miss cake decorating, I just might end up making this cake for her wedding, which will be a great honor.
 |
| Backside of her dream gown (it'll be light blue) |
 |
| Inspiration for medieval bridal party. |
 |
| Front side of her dream gown. |
BRIDAL PARTY ATTIRE (of which I belong as a bridesmaid) is going to have a lovely attire. My friend doesn't want a traditional white dress, but prefers to go with a light blue color (much lighter than the dresses shown above for the bridal party) and red roses everywhere. I suggested that we use the theme of red and light blue for these reasons, and the bridesmaids will have rose red dresses with light blue accents, and the bride will have a light blue dress with the rose red embroidery...of course all dresses will be similar in that they will have a non-traditional feel. The front of the dress is going to be lace up corset instead, and the bell sleeves will have a satin rose red interior. Everything is custom made and tailored. When I suggested this to her, she started beaming and got teary-eyed. It felt so exciting to be part of this wonderful day for her. I've known her for almost four years now and I am so proud to assist her in celebrating the happiest day of her life.
 |
| Inexpensive Rose Centerpieces. |
DECORATIONS: Of course, to get the beautiful effect of the medieval wedding, decorations must be used to create that said effect. Here are some decor ideas I came up with, that can actually be quite inexpensive to use. If we do book the location I showed previously, then I want to get candles in every window arch, but to make the interior look even more authentic, I am going to mix different vases, candles, and possibly hang some Medieval paintings and mirrors up around the vicinity. The way the lighting is during the daytime, and with the trees casting shadows, it will be so beautiful and elegant.
 As far as other ideas go, we are thinking about digging a pit (if permitted at the reception site) and making a spit and roasting meat in a old European-style feast. (I know Hawaiians do spitfires with a pig, but the food is still up in the air at this point). Everything we do will be updated, but this is the basic ideas I've come up with today.
 Obviously there is a lot more involved than just these items, but this is the basic idea of what we discussed today, amongst other ideas. What do you think? Please leave me a comment and tell me what you think. Should I try my hand at planning weddings? Of course I won't stray away from my make-up artistry, but maybe getting my hand in another field won't hurt? Especially since I'm going to be doing a lot of bridal make-up. If I do end up doing this, I am going to refer all photography to my friend, Kayla, because she is a completely amazing photographer and artist. If you have a specialty (be it with catering, cakes, floral arranging, alterations and dress fittings...etc.) and are in Western Washington State, AND you would like me to consider referring your services, send me a link or email me at emalyce.weiss@gmail.com with a link to some online photos or your web page. Thank you!


